Appearance
Installation
Requirements
Cartify is an e-commerce platform built on top of the Laravel framework which has a few system requirements. You should ensure that your web server has the following minimum PHP version and extensions:
- PHP 8.1 or later
- Mysql 8.x or later
- and the following PHP extensions (which on most systems will be installed by default):
- BCMath PHP Extension
- Ctype PHP Extension
- cURL PHP Extension
- DOM PHP Extension
- Exif PHP
- Fileinfo PHP Extension
- GD PHP extension
- Intl PHP
- JSON PHP Extension
- Mbstring PHP Extension
- OpenSSL PHP Extension
- PCRE PHP Extension
- PDO PHP Extension
- Tokenizer PHP Extension
- XML PHP Extension
Installing Cartify on local machine or VPS
To get Cartify installed on your local machine or VPS, you will need to download the zip archive from CodeCanyon and extract it to your desired directory. You may do so with this command:
unzip cartify.zip -d cartify && cd cartify
Next, from your application directory run the following command to install all composer dependencies like so:
composer install
Creating environment configuration file
After the composer installation process is finished you will need to make a copy of .env.example to .env (this is where our application stores all the configuration variables). If you are on linux or macOS you can use the following command:
cp .env.example .env
Otherwise, you may use your text editor to create a .env file into your root directory and copy the content from our .env.example.
Creating application key
The next thing you should do after installing Cartify is set your application key to a random string, and you may do it with the following command:
php artisan key:generate
There is an alternative way to create the application key by using your text editor to edit the .env file. On the APP_KEY= variable enters the value of 32 random characters like so:
APP_KEY=oxVRayeDkVduD4oUAx3TiqNYoEeTrXY
WARNING
If the application key is not set, your user sessions and other encrypted data will not be secure!
Preparing database
Use any of your Mysql management software or phpMyadmin to create a new database for Cartify with utf8mb4 encoding. After that update your database credentials in .env file like so:
DB_DATABASE=<your-database-name>
DB_USERNAME=<your-database-username>
DB_PASSWORD=<your-database-password>
Please note that if your MySQL database is on a different server you should also update the following variables to match your external MySQL server connection:
DB_CONNECTION=mysql
DB_HOST=<your-database-host>
DB_PORT=<your-database-port>
Next, you should run the following command to start migrating your database:
php artisan migrate
By now, your site is ready to be viewed. You can do it by running the following command:
php artisan serve
then from your browser open up the http://127.0.0.1:8000 (this is url provided by PHP Built-in Webserver) and you will see your site.
TIP
The php artisan serve command is good for a quick preview of your local deployment, if you want to dig deeper please use Valet or Sail to set up your own local domain.
Installing Cartify on shared hosting
If you are on shared hosting, please follow these steps to get Cartify installed.
- Upload all files into the root directory of your hosting (usually
public_html). - Create a database named
cartifyand import data fromcartify.sql(it's located inside thedatabase\datadirectory). - Use text editor to create a
.envfile in the root directory and copy the content from our.env.example. - Change the following variables in
.envfile to match your setting like so:
APP_KEY=
APP_URL=
DB_DATABASE=cartify
DB_USERNAME=
DB_PASSWORD=
where:
APP_KEYis a string with 32 random characters.APP_URLis your hosting url or your root domain eg: http://yourdomain.tldDB_DATABASEis your mysql database name (it should becartify).DB_USERNAMEis your mysql database login username.DB_PASSWORDis your mysql database login password.
It is done! You can now open the URL to see your store.
Handling media upload
By default, Cartify use local drive to store its files in storage/app/public. To make these files accessible from the web, you should create a symbolic link from public/storage to storage/app/public. You may use the storage: link Artisan command:
php artisan storage:link
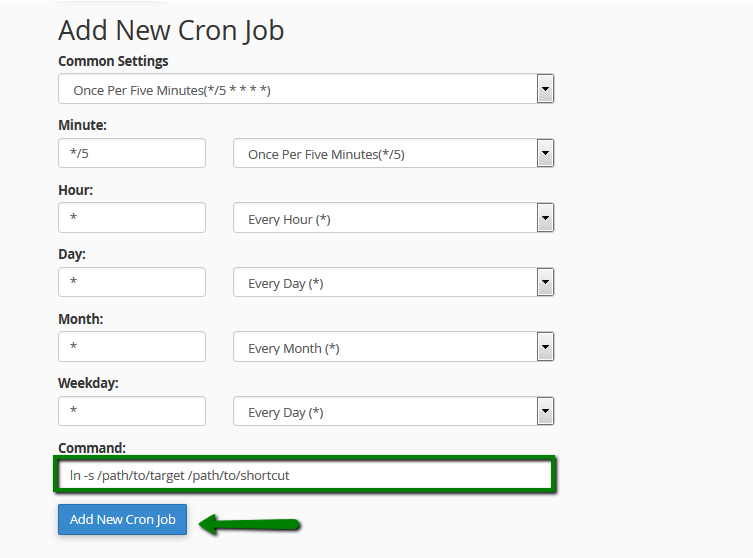
If you are using shared hosting the symbolic link can also be created via a cronjob using the following command:
ln -s /storage/app/public /public/storage


WARNING
Make sure that you delete the cronjob once the symlink has been created.
Importing country list
DANGER
You can skip this step if you are installing Cartify on shared hosting.
We need to use the country list to manage shipping and tax, so let's import the list of countries with the following command:
php artisan db:seed --class=CountrySeeder
Setting up admin account
After your site is up and running, you may want to check out the admin panel to see what's inside, don't you? So let's do it by heading up to http://yourstore.tld/admin.
But wait, you don't have an admin account, how do you sign in? No worries, I have made up a route to help you create an account to access the admin panel, just go to http://yourstore.tld/setup-admin-account to make it.
Now what you need to do is fill up the form with your information and hit the "Create Account" button to save it. After that, the application will log you in automatically and then redirect you to the admin dashboard immediately.
TIP
You may only access the URL /setup-admin-account if your application doesn't have any admin account otherwise, there is no way to access it at all.
🎉 Congratulation, you did it! Now let's get started by filling up content for your online store!
